This document will go through the basics of the Courses tab in Zone4 Timing. There are two important tasks performed in this tab:
- Dividing racers into “Course Groups”
- Mapping out the crossing order of your “Timing Points” and assigning “Timing Devices” to each timing point.
Setting up Course Groups
Course Group: A group of racers that all do the same course. Course groups may or may not be the same as start groups.
Some general examples of when separate course groups should be created are:
- Multi-lap race: racers are grouped into different race distances and will do a different number of laps. For each group of racers that does a different distance, you should create a separate course group. For example, in a race with 5km and 10km distances (where the 10km is two laps of the 5km course), create separate course groups for 5km and 10km.
- Point-to-point race: This is where the racers start at a different point than they finish. Separate course groups should be set up for each distance.
- Time limit race: This is where racers see how far or how many laps they can complete in a given amount of time. For every different time limit there should be a separate course group. For example, in a race where there is an 8 hour and a 24 hour time limit, create a course group for the 8 hour racers and a separate one for the 24 hour racers.
To get to the Courses tab, click the Courses button at the top of the page in Zone4 timing.

When you first navigate to the course setup screen, you will have two options:
- Create New Course Groups: This option allows you to split racers into course groups based off of any field(s) from your registration. Splitting racers using distance fields is very common.
- All Racers in a One Group: This option is presented as the default and is used when all racers are doing the same course.

Choose the appropriate option based on your race requirements.
If you selected All Racers in One Group you can go straight to Timing Point Setup.
If you selected Split Racers into New Course Groups follow the steps below.
- Use the drop down menu Fields to Group By to select a field from your registration to define your Course Groups. This will create different course groups separated by the field you chose.

For example, if you picked the race distance field, a separate course group for each distance will be created.
2. You can also define course groups based off of more than one field. To do this, simply select another field from the drop down menu Fields to Group By. Creating a more specific course group can be useful when you have different genders and age groups doing different courses. For example, your race may have junior women, senior women, junior men and senior men all doing different courses.
3. Once you have chosen the field(s) you will be using to your define course groups, a list of all the course groups will appear.

4. The preview list will contain all groups including those with no racers and groups with racers who have not selected a value for the chosen fields. An example of this is pictured below.

5. All the course groups that are checked will be created, while un-checked groups will not. You can manually check and un-check the groups by clicking the check box to the left of the group name.

Un-checking groups does not remove the racers from your race file. They will still appear in the “Racers” page and can be added to groups if needed.
6. You can also click the Only Groups with Racers button to remove all groups with no racers.

7. Once you’re satisfied with your course groups select the Create these Groups button on the bottom right corner of your page.

Just as a note, if you recreate your start groups after you have created course groups, your course group set up will be erased and you will need to recreate it.
Merging Course Groups
If some of the course groups you created are actually doing the same course you may want to merge them. To do this follow the steps below:
- To merge course groups select the Merge Racer Groups button pictured below.

2. The Merge Racer Groups window will appear. Here you can select which groups you would like to combine by clicking the check box to the left of the group.

3. Once the groups have been selected click the Merge button to apply the changes.
4. If multiple sets of groups need to be merged you will need to repeat steps 2&3.
5. Once satisfied with the course groups click Done.

6. You can then edit the name of each course group. To do this simply click on the course group name and type in the new name.

If you made a mistake and wish to go back to your original course groups or change the fields defining your course groups, click the Create New Course Groups button below.

This will ask if you want to reset all course groups and then, take you back to the first course group window and from there you can recreate your course groups.
Timing Point Setup
When you have created your course groups, the next step is to define the actual race course for each course group. This means mapping out the crossing order of your “Timing Points”.
Timing Point: This is a point on your course where you want to assign a time to a racer. The most common examples are a start line and a finish line. You may also use a timing point get lap times.
After you have created your course groups, a basic course map will appear below the header Timing Devices. This course may appear differently depending on the sport of your race, but generally you will see that a Start timing point and a Finish timing point have already been added to your course map.

You will notice that there is a light grey arrow pointing in the direction racers are traveling. This basic maps shows that racers will cross the Start timing point and then cross the Finish timing point.
All your course groups will use this basic course map. If you want learn how to create a completely different course for one of your course groups click here.
To add additional timing points to your course map, click the Add Mid-Lap Split button.

Adding a mid lap split would allow you to get racer times on a course other than the start and finish. This could be used if you wanted to get a racer times at a turnaround point.
To remove a timing point from your course, click the three dots on the right side of the timing point and select Remove this Crossing from the drop down menu.

Changing the Number of Laps
In multi-lap races and triathlons, different course groups often do the same course, but have to complete a different number of laps.
You can change the number of laps for each course group by typing the desired number of laps directly into the # of Laps column.

When you change the number of laps for one course group, a lap timing point will appear in your course map.

This timing point will record the lap times for any course groups that needs to do multiple laps of the course. It doesn’t matter if different groups are doing a different number of laps, they will all use the same lap timing point. The lap timing point will be ignored if the course group only needs to complete one lap.
Once a course group has completed the necessary amount of laps they will then cross the finish timing point.
Assigning Timing Devices to Points
At each timing point configured in the race, you will need to select at least one device that will be used to record times.
Timing Device: Electronic device that will assign a time to the racer. These are usually phones or activators.
These devices must be assigned to the timing points the same way you will set them up on your race day. For example if activator 5 is going to be your start device on race day, make sure to assign it to the start timing point on your course map.
To assign a timing device follow these steps:
- Click on the words Select a Timing Device beside the timing point name.

2. The Select a Timing Device window will open up. Here you can search for the desired timing device by typing the device number into the search bar.

3. Select the desired timing device to assign it to your timing point. The name of the device you selected should now appear on the timing point.

Using Multiple Devices at the Same Timing Point
To protect against technical failure or human error sometimes multiple devices are used to record times at the same point.
To add another timing device:
- Click on the three dots to the right of the timing point and select Set Timing & Backup Devices:

2. Then click the Add a Timing Device button and select any additional devices from the list that appears.

3. Once you have added all the devices click Done.

4. The names of some of the selected timing devices should now appear on the timing point.

Deleting a Timing Device from a Timing Point
If you need to remove the device you are using at a timing point, you can delete the device by
- Clicking on the name of the timing device at that point.
- This opens up the Add / Remove Devices window. In this window delete the device by clicking on the X to the left of the device’s name.

3. Click the Done button in the bottom right of the window.
4. The device name should now be removed from the timing point.

Using the Same Device to Record Times at Multiple Timing Points
In some situations you may want to use a single timing device to record times for different points of your race. You will still need to have separate timing points, but you can assign the same device to both points. For example, in a multi-lap race if your racers cross the finish line each time they complete a lap, you can simply select the same device at both the “Lap” and “Finish” timing points.
Once a device is already assigned to one timing point it is easy to add it to another timing point as well.
- Click the words Select a Timing Device on the desired timing point
- In the Add / Remove Devices window, there is a Re-use the devices from a different point section. You should see the names of devices you’ve already assigned listed here.

3. Click Select this Point. You should now see the name of the device selected on your timing point
Using Backup Devices
Backup Device: This is a timing device that will record times, but those times will not automatically be assigned to racers. The times will be stored and linked to racers so they can be referenced later on if there is an issue with your main timing device, but will not affect the results by default.
In general, if you have multiple devices recording times at a point they should all be used as Timing Devices instead of being added as backup devices.
Backup devices can be added to and removed from each timing point using the same processes as adding and removing additional timing devices (See above). However, select Add a Backup Device instead of Add a Timing Device.

Using Precall Devices
Precall Devices: These devices are setup 15-20 seconds before the finish line (or any other timing point) and will provide data to the “Commentator View“. Your race announcer will be able to call out racer names as they approach the finish line, instead of after they have crossed the finish line. This way the commentary has a much more live feeling than an after the fact announcement of finishers.
Precall devices can be added to and removed from each timing point using the same processes as adding and removing additional timing devices (See above). However, select Add a Precall Device instead of Add a Timing Device.

Setting Minimum Split Times
Minimum splits: The shortest amount of time that it should take for someone to complete that section of the race. Times that are shorter than the minimum split time won’t be assigned to racers.
Having min splits allows you to ignore unreasonably fast times, which saves you from going in and manually changing times.
Good example of when to use a min split is if there is a short cut racers can take instead of doing the real course. You can add a min split that is longer than the short cut would take, but shorter than the fastest time on the real course.
To set a minimum split time, type your desired minimum split time in the Min Split box under the desired timing point. This minimum split time is for the course section from the timing point above the min split box to the timing point below it.

If you find that during your race the min split is too long or too short, you can go back and change it while your race is going on.
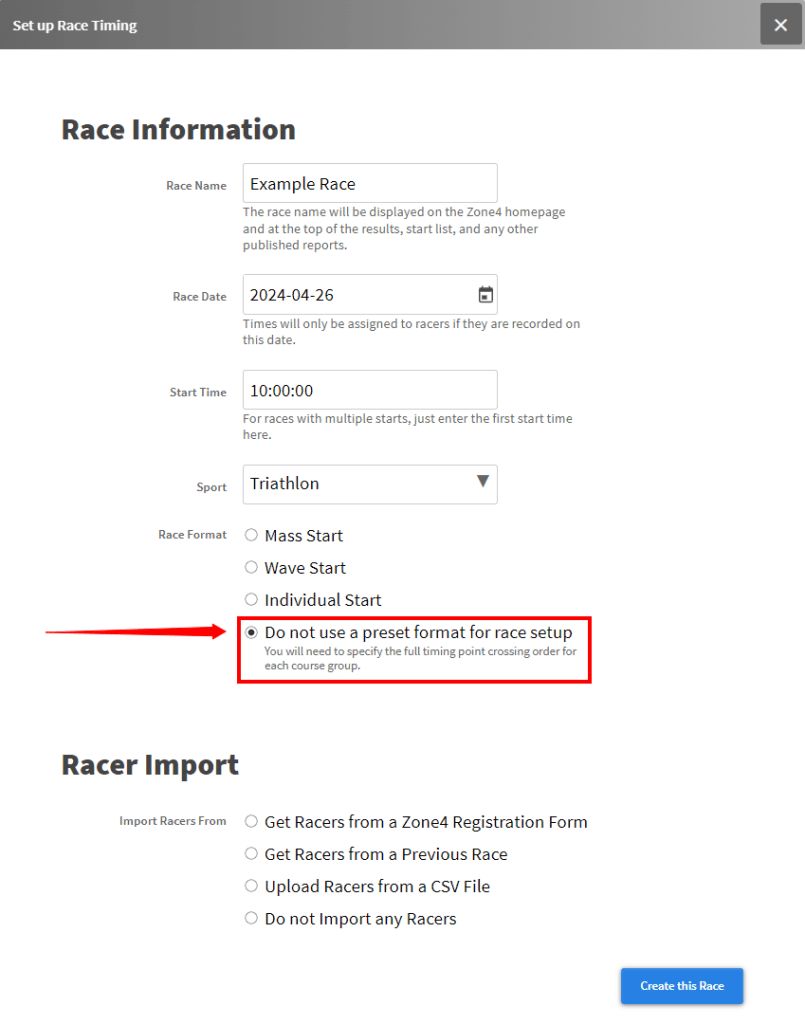
Setting a Custom Course
To set up custom courses, you’ll first have to create the race file based on that template. After you select the sport, chose the Race Format on the bottom. This will be the same for all Sport Templates, and allow you to create custom courses for each course group.
To create each custom course now, click on the Edit button to the right of the Course Group names. This will allow you to assign timing devices as you see above.

This can be time consuming, especially if you have a lot of courses, or there are only small changes to be made to each course. In this case, there is the option to copy the course set up from a previously built course group, as illustrated below
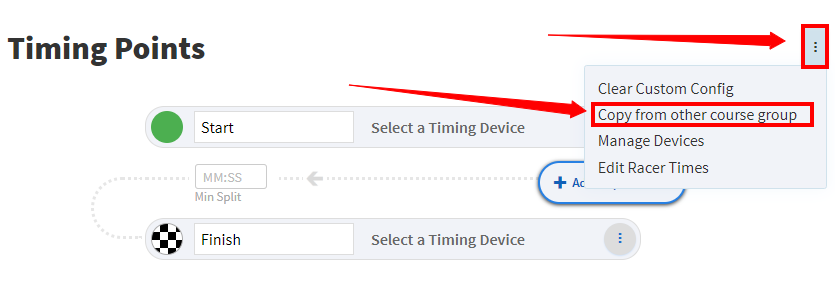
Click the ellipsis to the right of the Timing Points heading, then select the Copy from other course group option. This will open a window that allows you to select another course group to copy. You can then edit the custom course to fit your needs.
If you have chosen to not use a pre-built template, then there is no shared course at all. This means the basic course map will be replaced with a list of active timing points which appears when you click on the Timing points button.

To the right of each Point Name will be:
- Timing Device that is assigned to that point
- A list of the Course Groups that use that timing point in their race.

In this example, all four courses start and finish at the same timing point, but each use a different intermediate timing point.
Review
Course setup is the most critical step of the race.
Review your setup carefully to make sure that the correct devices are assigned to their proper locations. It is helpful to label the physical devices you are going to use with their location (Start, Finish, etc.), so they are easier to set up on race day.
Also check that each racer group has been assigned the right number of laps.
Be sure that you are satisfied with your Course Groups before proceeding to setting up results. Any changes you make to Course Groups will erase the result sets you have already created.
Once your review is complete you are now be ready to proceed to the Setting Up Results section of the user guide.