The following is a non-exclusive list of possible issues that race timers might encounter.
Set Up
Creating Age Categories for Start Lists/Results
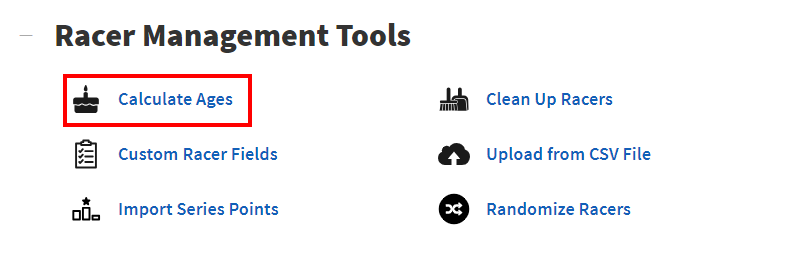
If you need to create categories based on ages, you first must make sure you have ages listed for your racers. If you have Dates of Birth, but no Ages, you can use our Calculate Ages tool to calculate the proper age for the racers.
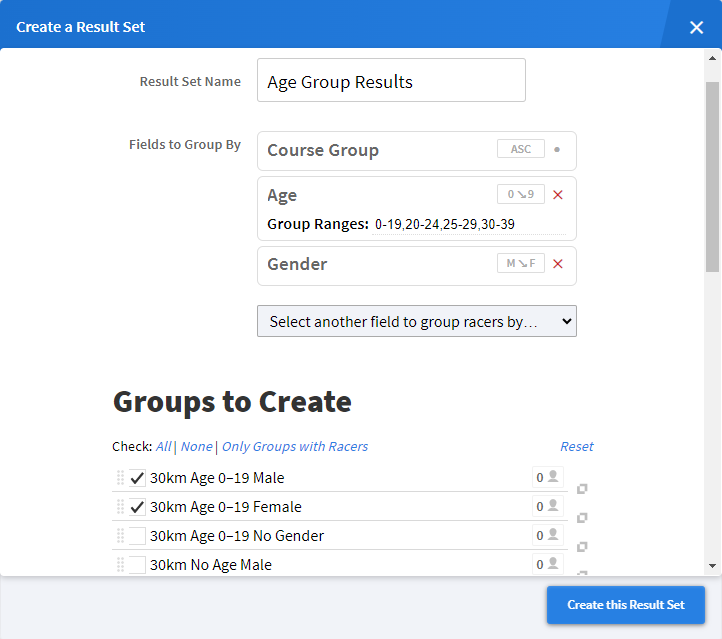
Once you have Ages, you can then select them as a Field to Group By when you are creating your groups. Select the Age field from the dropdown menu, and then in the space below, enter the number ranges you need for your groups. Note that any number excluded from a range will also be excluded from a group.
For more information check our documents here.
Keeping bibs/chips for multiple races
If you or your race organizer wants or needs to keep the bibs and/or chips the same between different race files, you can do this by creating your next race file from the current race.
When building the race file, instead of selecting a Zone4 Registration, or uploading a CSV, choose Get Racers from a Previous Race. This will import all the associated data from the first race into the second.

When doing this it is important to note that you DO NOT assign bibs or chips in the new file, as this will erase the previous numbers
Last minute changes to CSV
If there are last minute changes to the CSV after you have uploaded it into your race file, you have a few options. In extreme cases, you might have to start over with a new upload. In other cases, you might be able to just fix a few racers manually.
Depending how many racers you need to add, you can also upload a new batch from CSV.
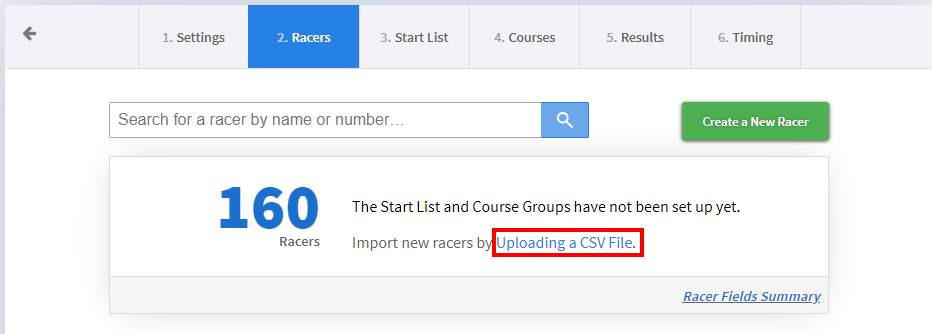
First you’ll need to download a template. This is very important, as you must make sure your column headers are exact when uploading new racers. One the Racers tab, click the Uploading a CSV File link. This will open a window showing you the column headers and the allowed values. If a column or value you need is missing, you must add it by creating or editing an option under Custom Racer Fields.
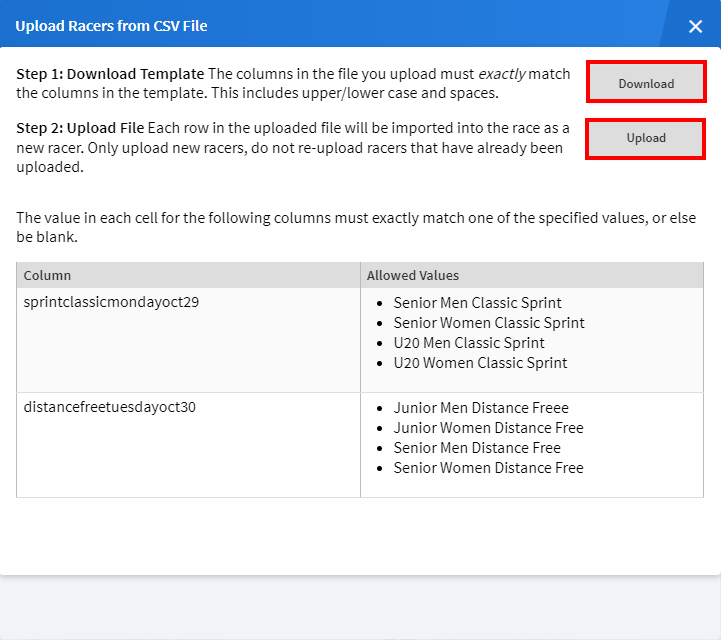
Once you see the values you need, click Download to download the template. You can then add your racers to the template. Once the racers are added, you can Upload that file, which will import your new racers into the race.
New Racer added in New Category
If a new racer is added to your race file, but they are in a category or group that you have not made in your start list, course groups, or result sets, you will have to remake these to include the new group.
It is easy enough to do this, as in all three places you will see a button to recreate groups.

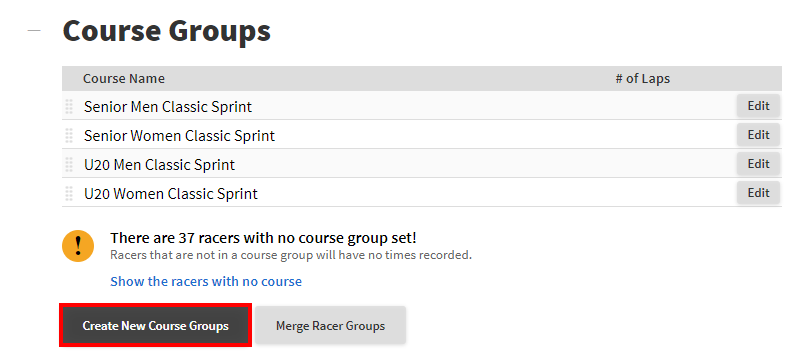
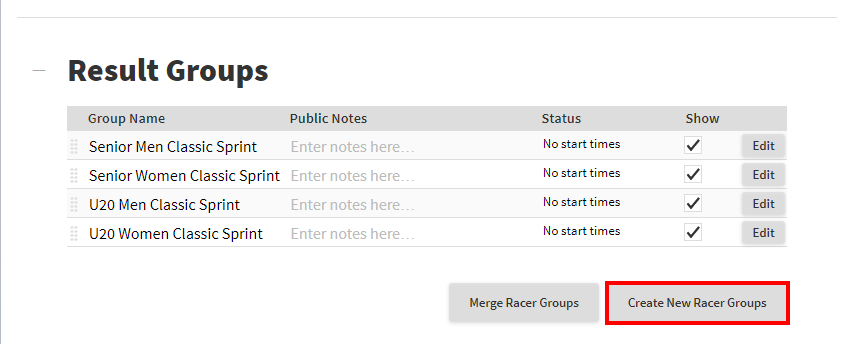
Keep in mind, that even when you re-create the start list, this doesn’t mean Racer Numbers, Chip Numbers or Start Times are reassigned. This means you might want to simply edit the new racer, rather than reassign everything.
Also, in most cases, you cannot recreate Course Groups without deleting your Result Sets. You will be prompted if you attempt to, and you already have a result set made.

Building Racer Reports
If you need to build a report on your race (such as a bib sort list to easy bib pickup/hand out), you can do that from the Reports section of the Racers tab.
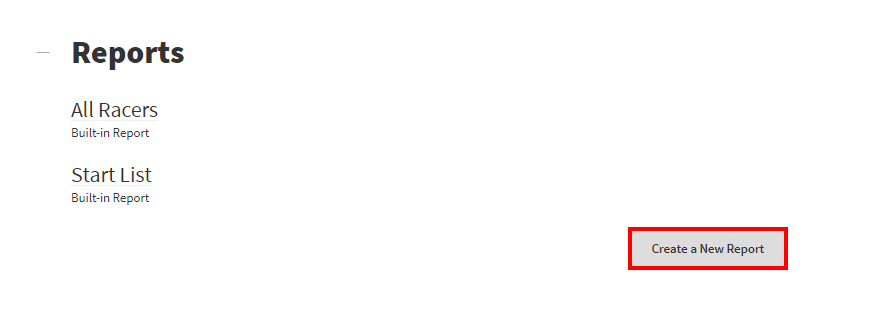
At the bottom of the page, click the Create a New Report button. You can then enter the name of your report, and select columns of data based on your racer fields. At the bottom of this page you can choose what fields to sort and group your data by. Sorting determines the order the racers will be displayed in, Grouping will divided the racers by that field heading.

Creating a Seed List
A seed list is a type of report that displays how racers will be seeded for your race. Depending on your sport, this might be the same as the start list, but notably should never have bib numbers or start times on it.
To create the Seed List, start by building a new report. Include the racer’s names and other information that you’ll need to display, such a club and the seed field. Then, sort by your seed field, and group by your category field. This should then create a list of racers in the order they will be seeded in.
Once you have the Seed List, you’ll likely need to share it. This can be done by clicking the Modify Report in the top left corner of the report, and then choosing the Report Visibility you want. Allow sharing by link will allow you to send the report to other for review, while Shared Publicly will post the report on the Event Page for the race, provided one has been set up.

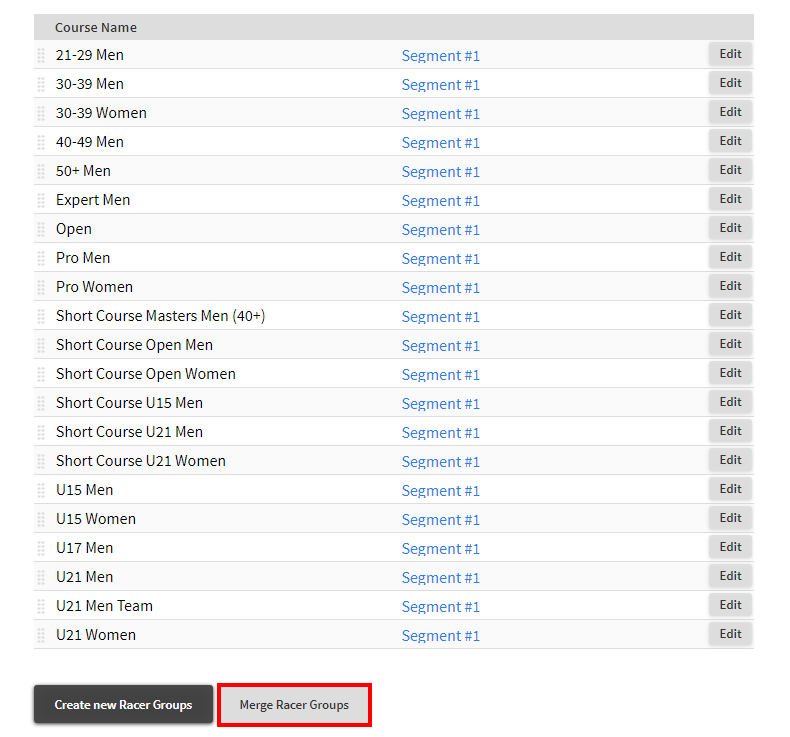
Merging Course Groups
Knowing when, why and how to create and merge course groups is very important.
Course groups are very useful, as they will always keep specific groups apart. When deciding how to build your course groups, you should always try to keep it to the smallest number of groups that will never be compared to one another.
For example, if you have a 10 km and a 5 km distance in your race file, these should be your courses, as the two distances should never be comparable. You might make result sets that subdivide your courses further, but you would never combine the 10 and 5 km groups into one result set.
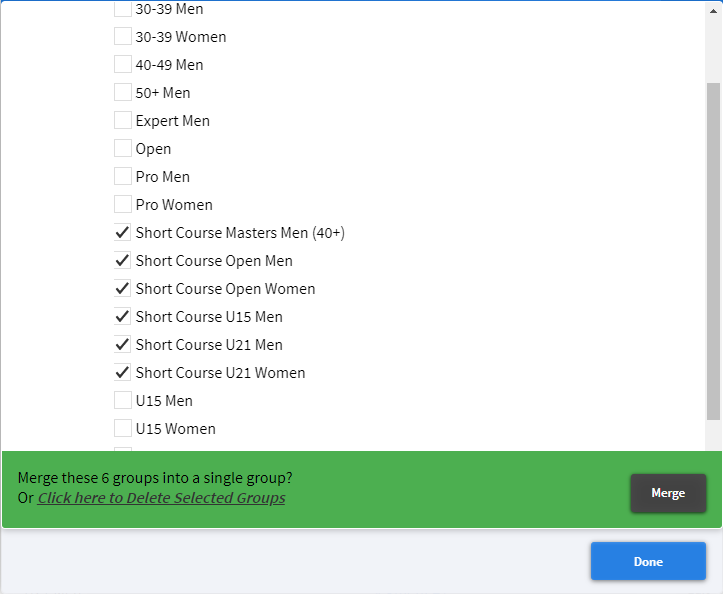
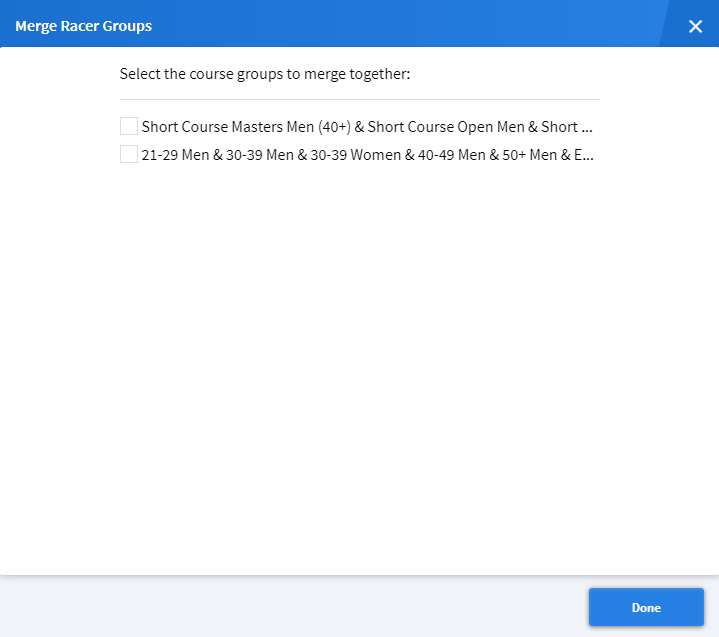
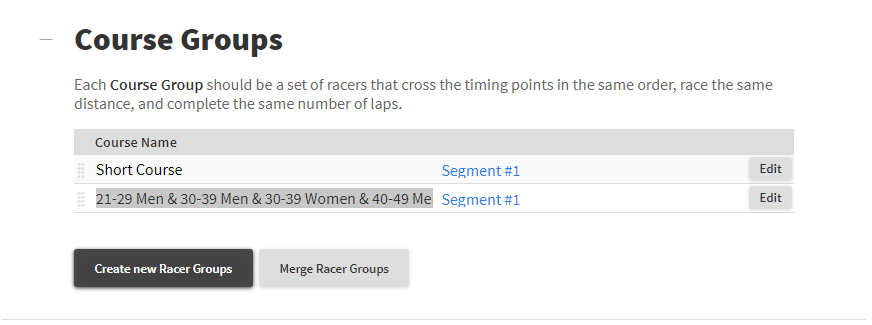
If your category field is overly precise, you might have to use the merge tool to merge your course groups. In the example below, this enduro has a short and a long course, but the category field contains a break down of each age and gender group. In order to keep the number of courses down, click on the Merge Racer Groups button. Then select the groups that should be combined together and click Merge. Repeat this for other groups. This leaves you with two courses, short and long. Click on the Course Name to rename the courses to something manageable.
Race Day Troubleshooting
Min Split Troubleshooting
If you ever see a result set where one or more racers have impossibly short split times, or are lacking split times completely, you might want to check your min splits. Min Splits are a setting for the minimum time between split points. This is designed to weed out incorrect times that are generated from someone crossing a timing point when they shouldn’t have. A common example for this is if someone drops something on one side of a timing point and goes back to pick it up, or if a racer takes a wrong turn at a trail junction, or leaves a transition point the wrong way.
You can find the Min Split field on the Courses tab, between the timing points of your course. To make sure they are set correctly, you’ll have to have some idea of how long it will take people to get between the splits. This doesn’t have to be exact, it just needs to be long enough to filter out the bad times, and short enough that you don’t filter legitimate times.
If you set them wrong before the race, that’s ok. You can change them during or after the event. However, if a racer has been affected by incorrect min splits, once you have fixed them you will have to clear that racers times and reprocess with the new min splits in place. This should then ensure only the proper times are assigned.
Click here for more information on min splits.
Issues with Chip Handout
Occasionally, through miscommunication, GoChips might be handed out to the wrong racers. This is obviously very problematic, as times will not be assigned correctly to the affected racers. Fixing it, or even realizing there is an issue can be very complicated however.
Diagnosing the issue
In some cases, it can be very obvious that there was a problem with chip handout. For example, if you have specific start or course groups, and you start to see times from racers who shouldn’t have started yet, that is a good indicator. Also if you have a backup timing device that is recording bib numbers, this can highlight the discrepancy between racer and timing chip.
In other cases though, you might not have much to go on. Looking for times that don’t makes sense (too long or two short compared to others in that category/distance) can be an indicator of this.
Fixing Chips
Once the chips have been handed out, it is very hard to sort them out. If the racers having started yet, you can find the affected racers and make sure the chips get sorted to their correct racers. Once the racers have started though, you do not want to do this.
Instead, find the affected racer in Zone4. Click on their name to bring up the Racer Window and find the Chip field. Enter the correct chip that they are wearing instead of the old one. After you have done this, you will want to clear any assigned times and reprocess the racer to make sure that only the times from the actual chip they have for the race will be assigned to them.
One thing to note is that you cannot assign the same timing chip to multiple racers. If you have a group of racers wearing each other chips, you must clear a chip from a racer before you can assign it to another.
Mid-Race Course redo
If you find out mid race that your course groups are wrong, you can recreate them. The key thing to remember is that by re-creating course groups, all your result sets will be deleted, and so you’ll have to recreate these as well.
Use the Create new Racer Groups or Merge Racer Groups buttons to edit the course groups.
Racer Changes Distance/Course Mid Race
If you find out a racer has raced a different distance or course groups than what you have them listed as, you can move them into the proper group, even during the race.
Find the racer, and open up their racer window. Find the racer field that determines their course group, and change it to the correct one. This could be the Category field, Distance, Age (sometimes people register with the wrong age), Gender, or some combination of this.
After you do this, you should check their times to make sure they make sense. If the changes affected the start group, make sure their start time is accurate to when they started.
Devices Setup in the Wrong Location
Occasionally, you might realize that the activators or other timing devices were setup in a way that does not line up with the Course Setup in the race file.
If racers haven’t crossed the timing points, you might be able to change the physical set up. If that’s not feasible, or if they have already started crossing the lines, you’ll have to make the change on the software side.
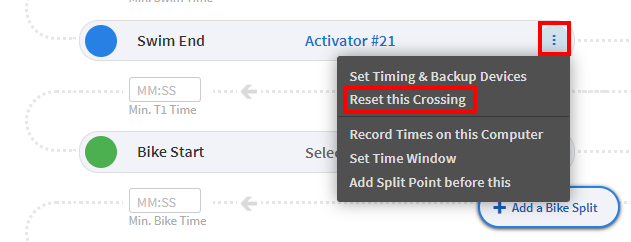
Go to the Courses tab, and scroll down to the Timing Devices. Find the timing points that are affected, and click the three-dots to the right to open up that menu. Select Reset this Crossing. This is important (!), as simply unassigning a timing device doesn’t remove it from the Timing Point. Once you have reset the crossing, you can assign those devices to a new crossing, but you should also reset before adding new timing devices.
Resetting Crossings
If you get in a state where you see a blue No Timing Devices on your crossings, you’ll have to reset the crossing as above. You might see this if you tried to swap a device, or if you were trying to clean up unused timing points and deleted the wrong one.
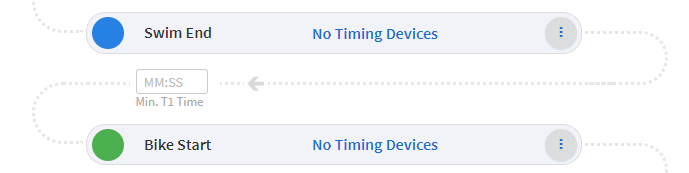
If this is the case, use the Reset this Crossing option (see above), which will set the crossing back to the default.