Connecting Hardware
The local server kit includes a few pieces:
- The local SERVER (aka “Serverbox”)
- A ROUTER
- A power adapter with three connectors – one for the server, one for the router, one for an optional cell modem
- (optionally) a cell MODEM
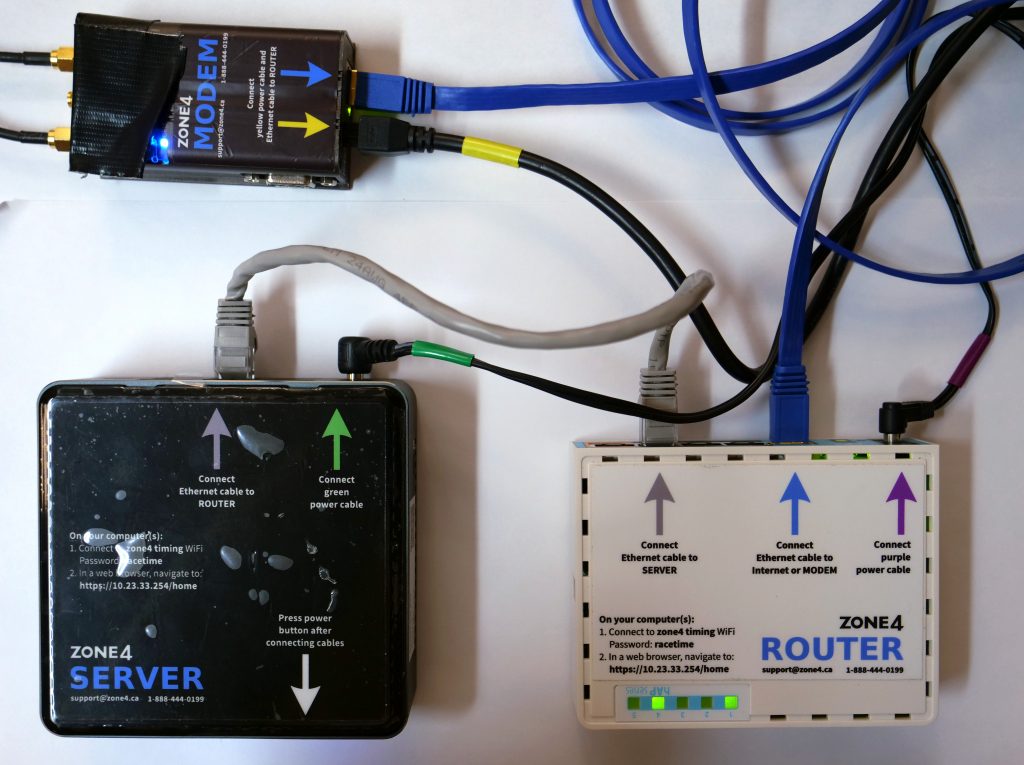
Connect the local server and router
To set up the serverbox and create a wireless network for phones to talk to the serverbox on, connect the following wires:
- Connect the power adapter to wall power or a generator.
- Connect power port on the router and local server.
- Connect a network cable to any of the middle three ports on the router (circled in red and numbered 2, 3, 4 below):
- Connect the other end of that same network cable on the local server (circled in red, below): Use Grey short Ethernet cable.


This is all that needs to be connected for offline operation – if you are set up at a race and have no internet connection, you’re ready to turn the serverbox on – push the power button on the front.
Connecting to the internet
If you are using the local server at a race with internet access, or if you have used the local server at a race without internet access and have brought it back to a location that does have internet, you will need to connect the left-most port (labeled “internet”, circled in red below) to an active internet connection, such as one of the LAN ports on your internet router at home.

Using a Cell Modem
Zone4 has a limited number of cell modems available for rent for use with local servers. A power connection for the modem is included on the same power adapter. To use a cell modem, connect the modem to the yellow plug on the power adapter. The blue light on the modem will turn on to indicate that it is powered.

Then, connect a network cable from the LAN port on the modem to the internet port in the router (circled in red, above). The top three (green) lights on the modem indicate the connection strength. At least one of them must be lit up in order to be connected to the internet.
Accessing the Local Server
The included modem broadcasts two wireless networks: one called “Zone4 Timing” and one called “Zone4 Backup”. Zone4 Timing is a 5GHz network, meaning it does not share any frequencies with Zone4 Go timing chips and performs better, but some older laptops may not be able to connect to it. If you can see the Zone4 Timing network from your laptop, you should connect to it. If you can only see the Zone4 Backup network, you can still use it but will likely suffer from lost connections or slow speeds during the race.
Turn the server on by pushing the power button on the front, and connect to the Zone4 Timing wireless network. Then, navigate to https://10.23.33.254/login in your web browser.
Chrome or Firefox browsers work best for accessing the local server. Unfortunately, Safari does not work for offline Serverbox access.
Your browser will give you a security warning the first time you access the serverbox. If you are using Chrome, click ‘ADVANCED’ at the bottom, then ‘Proceed to localhost (unsafe)’. If you are using Firefox, click on the ‘Advanced’ button at the bottom, then ‘Add Exception…’, and finally click ‘Confirm Security Exception.’
You will log in with the username serverbox@zone4.ca, and can leave the password field blank. This will take in to the familiar UI you are used to seeing on zone4.ca.

Syncing Races
To sync races between the internet and the local server, the server must be connected to the internet. Follow the instructions above to connect the server to the internet.

If your club has a serverbox registered to its account, you’ll see a “Sync between serverbox and web” checkbox in the settings page for every race.
Any races from the last two weeks that have this option checked will be automatically synchronized between the serverbox and the internet while the serverbox has an internet connection: that is, any changes made on the internet while the serverbox was offline will be downloaded, and any changes made on the serverbox (times assigned to racers, racers entered, etc) will be uploaded.
If the serverbox has a good internet connection and a race is not syncing for unknown reasons, un-checking and re-checking this box is a good place to start troubleshooting, but be patient: large races can take a few minutes to synchronize, and interrupting it will make the whole process start over again.
If this doesn’t help, try restarting your Serverbox. This usually clears up any issues, but if problems persist, please contact Zone4 support.
Connecting Timing Devices
Phones
The phones you are using to record times will need to be switched over to connect to the serverbox instead of to the web. In the Zone4 Go app on each phone you are using, find the Settings page under the three-dot menu in the top right. Select Zone4 Server Host. Change the selected option from “Web Server” to “ServerBox“. Don’t forget to change this back to Web Server if you’re trying to time a race again without the serverbox.
Also be sure to connect your phone to the Zone4 Timing WiFi. The password should be written on the ROUTER. If not contact Zone4 for the password.
Note: When selecting “ServerBox” the phone will push times to you local server at 10.23.33.254 over your local “Zone4 Timing” wifi network. In this configuration, if you happen to have a SIM card in the phone AND this phone is in a location that DOES have some cell connectivity, it is critical that you turn OFF cellular data on the phone. The reason for this is that Android tries to be smart about figuring out the best connection to route internet traffic to and when Android is connected to both wifi and cell and trying to push to a local address, it can get confused as to where it should send times. The easiest way to disable cell data is to put the phone in Airplane mode by sliding down from the top and clicking on the airplane icon. Then re-enable Wifi and Bluetooth manually as pictured below to connect it to Zone4 Timing wifi and allow bluetooth reading of GoChips.

Connecting Summits
Click here to learn how to connect Summit timers to a local server.
Requirements for Using a Local Server
- A wired internet connection, either at the race site or at an alternate site you can connect to after the race
- An ethernet cable to connect the server to your internet connection.
- A laptop capable of connecting to 5GHz wifi networks.
- if your laptop says it has 802.11 A/B/G/N compatible, it has 5GHz. If it is only B/G/N compatible, then it is not.
- Ideally, the laptop should also have an Ethernet port. This isn’t needed for normal operation, but if we need to do any troubleshooting it can be helpful.
Troubleshooting
- If you are in an area where cell coverage is really weak, it may be better to leave the serverbox offline – do not connect the router to the cell modem, and turn off mobile data on any phones you are using to record times as noted above.