Here we’ll guide you through building a simple race to get you comfortable with how Zone4 Timing works.

Intro
This intro Timing Task is designed to give you a general overview on using the Zone4 Timing system for a simple race. This task is built to be highly structured so that you can develop a good base understanding of how to use Zone4 Timing.
By completing this task, you will learn the basics of Zone4 Timing and hit fewer road blocks when setting up your race. Once you have some base knowledge we recommend playing around a little in Zone4 Timing with the race you have created or with other practice races.
In this task you will:
- Create a running race with two distances
- Build a Start List and Course Groups.
- Assign Timing Devices to the: Start, Lap and Finish
- Build two result sets (Overall and Age Group)
- Get times for racers
Essential Rules
Before we start there are two essential rules you will need to follow while making practice races in Zone4 Timing. These are:
- Never make changes to a Pre-Existing race file. Some of you may have access to an organization that has been used to time other races. Until you have a good understanding of Zone4 Timing, never click on an old race file because you may end up changing something accidentally which could affect the results.
- Do not publish practice race results publicly on zone4.ca. This one is not as crucial because you can always un-publish results, but it is still best avoided.
If you don’t know what a race file is or how to publish results, don’t worry that will all be covered here.
To Get Started
Login to your Zone4 Account
To get started login you your Zone4 Account.
If you do not already have a Zone4 account click here to set one up.
Download CSV
Download the .csv file by clicking the link below and store it somewhere on your computer where you will be able to find it later. If your browser blocks you from downloading the file, there should be an un-block option in the URL.
Create a Race
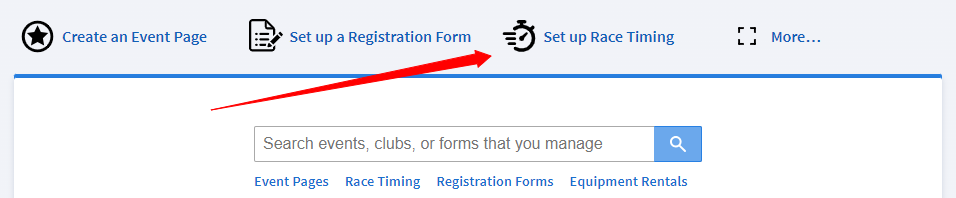
Go to zone4.ca and Login into your Zone4 Account.

Then select Time a New Race.
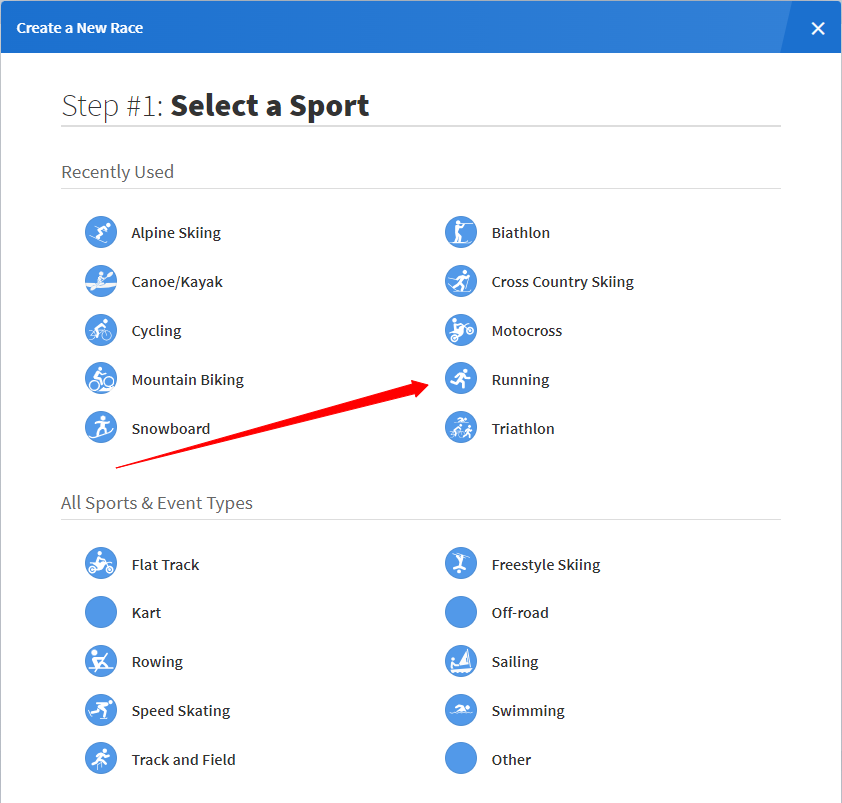
Next, select Running as the sport.
Fill in the race information:

- Set race format to Gun Start (Everyone gets the same start time).
This is all shown below.
- Race Name: Recommend naming “Your Name-Task1″
- Race Date: Leave on today’s date

Once you’ve entered the basic race info click the Next: Racers button.
For a real race, if your registration is done through Zone4 you will be able to select “Get Racer from Zone4 Registration”. However, for this task we will select “Upload a CSV File”.

Select the .csv file you downloaded earlier.
Once you have selected the file click Fields
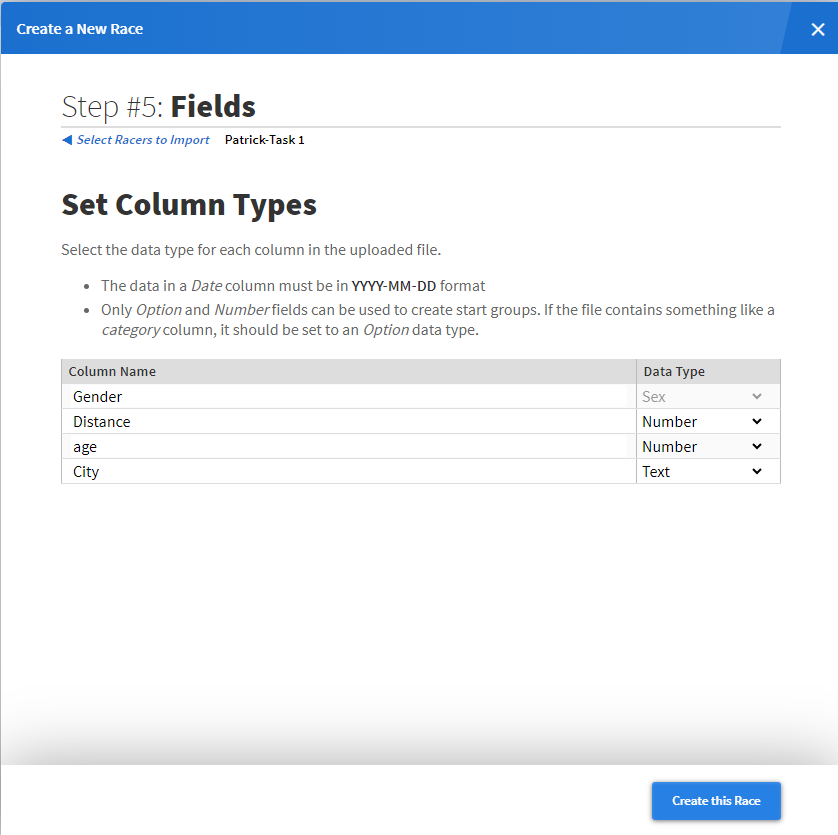
Here you can chose the Data type of the Field. It’s a good idea to set any field that will be used to create groups in your race file to an Option. In this example Distance would be set to Option. Later we will cover how to change this after you create the race.
You can now click Create this Race.
Overview
You are now in the Zone4 Timing system. This is where you will configure your race file to make it suits the needs of your event. The 6 different numbered buttons at the top of the page are used to access the main pages in Zone4 Timing that will be used for configuring your race file.
We will guide you through all these pages in further detail.

Settings
Click on the Settings button to access the settings page.

This is where you can configure a variety of settings for your race. Today we will only look at the “Race Time Window.”
By default this is set to 6:00 to 18:00 on the day of your race (times in Zone4 Timing are always displayed using a 24hr clock). Any times recorded outside of this window will be ignored by default. If you expect to be timing your race outside of this time window you will need to adjust it.

Set your time window for your race then navigate to the Racers page.
If you would like to learn more about the Settings page and basic race setup click here.
Racers

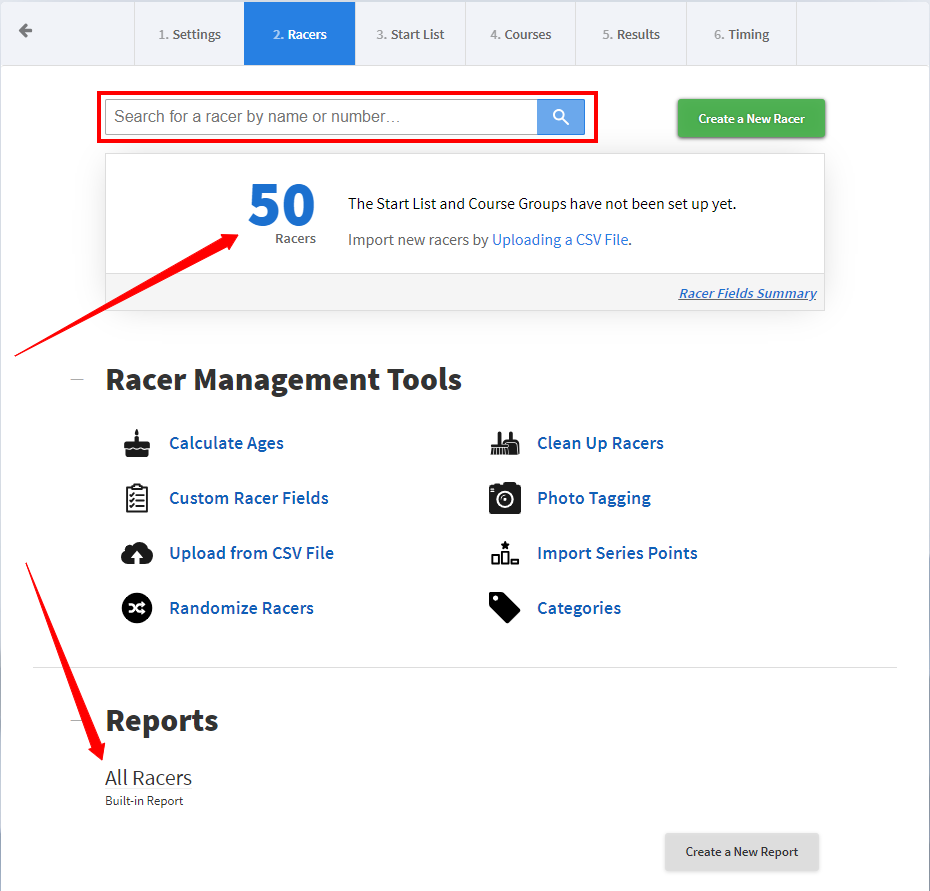
This page gives you an overview of all the racers that have been imported.
You can use the search bar to search for individual racers or click on the number below, or the All Racers List to get a full list of the racers.
If you click on a racer’s name you will open their Edit Racer window. In this window, you will be able view and change any information unique to that racer that has been imported from the registration. Note that:
- If you click on a racer’s name anywhere in Zone4 Timing (Start List, Results, etc) you will open their Edit Racer window.
- Changes made to a racers information here will not be reflected in the registration system.

Reports
On the Racers page you also have the ability to generate reports. For example, if your event is giving out T-shirts and you want an overview of the sizes racers ordered, you can generate a T-shirt report. We will not be covering that in detail here, but if you want more info click here.
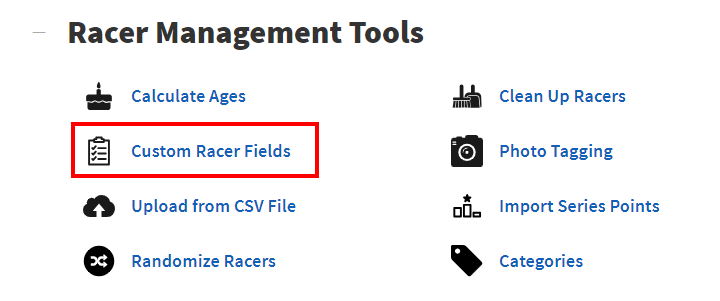
Racer Management Tools
This section gives you a whole bunch of features that may be useful for your race. The two features that are used the most are Calculate Ages (used to calculate ages based off of DOB) and Custom Racer Fields. Today we will only look at Custom Racer Fields, so select this option.
Here you will see a list of all the racer fields that were imported from your registration. If you select the Edit button you will be able to change the Field Name and Data Type.
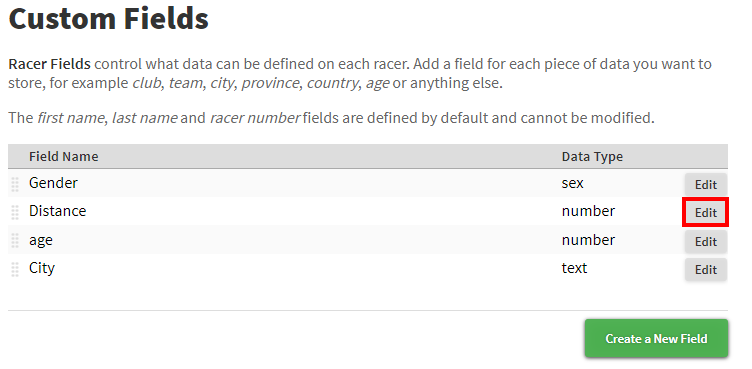
If you are importing racers from a Zone4 Registration you will likely not need to change anything here. This is because the type of field was selected when the registration was built, however because we are using a CSV import for today’s task we will need to change the Data Type for the Distance Field.
This is because that field was brought in as a Number Field, but to use this field to sort racers into groups we need to make it an option field. (You may have set this to option during the racer import.) So click on the Edit button for the distance field.
Change the Data Type to Option. You will see the two options get populated in a list below the data type.
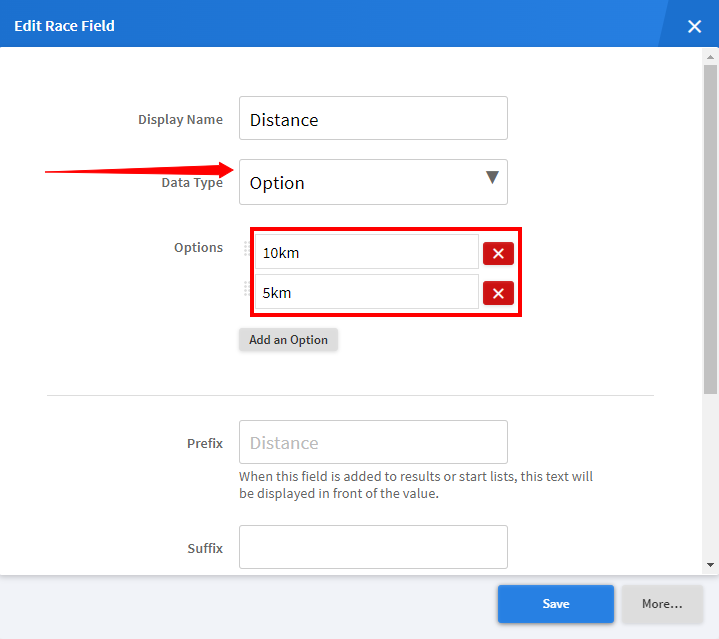
Once this is done click Save and then exit out of the racer field window.
If you would like to learn more about the Racers page click here.
We will now create the start list.
Create Start List
Select the Start List page.

The Start List page is where you will:
- Sort racers into start groups (groups of racers who start together in the same sequence)
- Assign racer numbers
- Assign chip numbers
- Assign scheduled start times
Start Groups
Here you can use fields from your registration to separate racers into start groups. For this example we will create 2 groups based on the distance racers registered for.
Select the Split Racers into Start Groups option.

You can use fields from your registration to sort racers into groups, including:
- Option
- Number
- Gender
In this case, we will use the distance field from the registration. Once selected, make sure the No Distance option is unchecked. Then select Create the Start List.

Once this is done you will be brought to the Start List page. Here you will configure your start groups by assigning racer number, chip numbers and Start Times.
Assigning Racer Numbers
Racer numbers correspond to the bib numbers that racers will be wearing during the race. The numbers you assign will depend on what is available for your race. For this example we will select 1 as the first number.
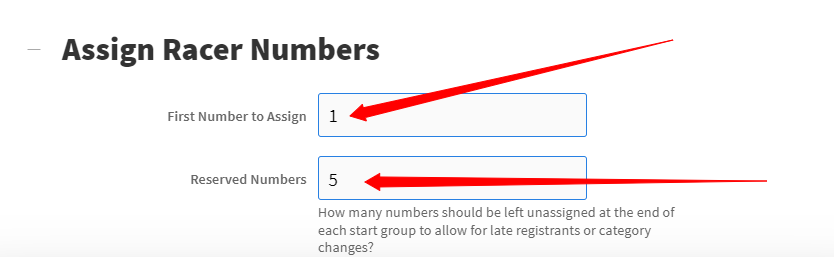
Next you will set a number of bibs to reserve at the end of the group. This is to allow for late entries or changes. For this example we will set it to 5.
Sort Order
Next is Sort Order, also called seeding. Seeding is the logic used to assign racer numbers. The most common options used are “Random” and “Alphabetical”. For today’s task we will use “Alphabetical.”
Select “Custom” as the seeding type (this is the default option).
For seeding order select; Last Name and then First Name. This will sort racers alphabetically by last name and first name.

Click Assign Racer Numbers.

Assign Timing Chips
After you assign racer numbers, you will assign timing chips using the “Assign Timing Chips” button. For today’s task we will not assign any timing chips.
Assign Start Times
This is where you will assign scheduled start times. Note that scheduled start times are not used for timing. They are for scheduling and display purposes only.
First enter the start time you want to assign put a 10min gap between groups and press the Assign Start Times button.

Once this is done press the View Start List button.

Your start list should look like the one shown below.

We are now ready to create courses.
To learn more about creating a start list and assigning bib and chip numbers click here.
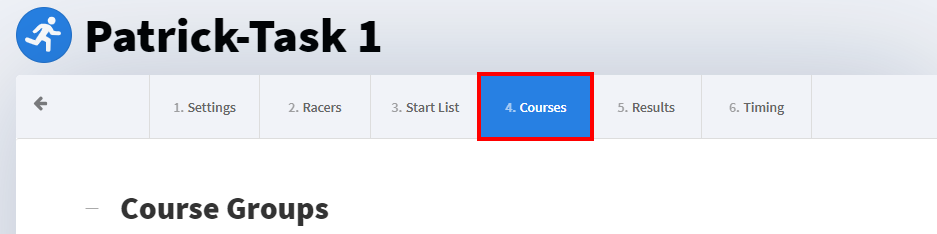
Create Courses
The Courses page is where you will separate racers into different course groups that reflect the physical courses that racers will be completing (such as 5km and 10km). This is also where you will assign timing devices.
- What is a Timing Device? A timing device is a piece of Zone4 Timing Hardware that is placed at a timing point to record times. These can include a:
- GoChip Activator
- Phone with Zone4 Go App
- Summit Timers
- Rapidcam
You will see that the Courses page is divided into two sections: Course Groups and Timing Devices.

Course Groups
For this example, our course groups will be the same as our start groups, since the start groups were already sorted by distance. Use the drop-down Menu to select Distance.
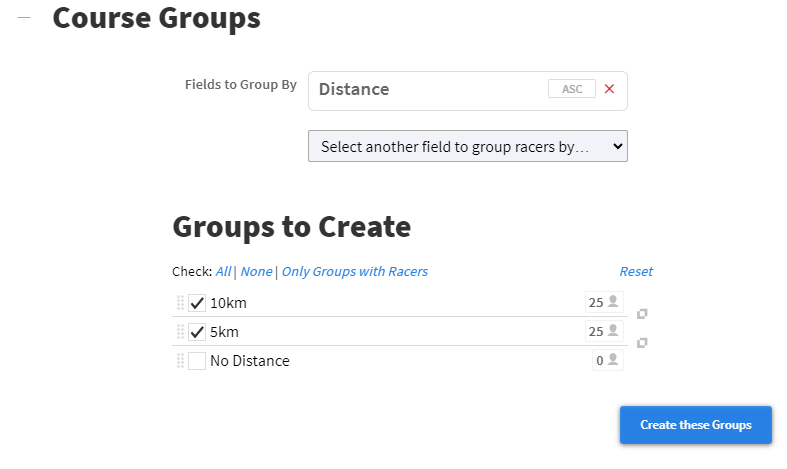
You will see that the course groups are automatically grouped by the start groups, which is exactly what we want for this race.
Click Create these Groups.
Configuring Course Groups and Assigning timing devices are the two main tasks that need to be accomplished in the Courses page.
Configuring Courses
In a simple multi-lap race (like this one), configuring courses consists of assigning the correct number of laps.
Note that the number of laps corresponds to the number of laps that are being timed. If you have a two lap race, but are not timing the lap, this would be configured as a one lap race.
For this example we will be assigning 2 laps for the 10km and 1 lap for the 5km. In a real world situation, this would likely be a race where the 10km is two laps of the 5km course.
Set the number of laps for the 10km course to “2” as shown below.

Assigning Timing Devices
Assigning Timing Devices consists of adding timing hardware to timing points so that they correctly represent the Crossing Order of racers.
Timing Devices, Timing Points and Crossing Order
- Timing Devices: A Timing Device is a piece of hardware used for race timing. In a race situation a timing device is setup at a Timing Point to record passing racers. Most often these timing devices are Activators (for GoChip), but they can also be; Android Phones with the Zone4 Go app, Rapidcams or Summit Timers.
- Timing Points: Timing points are physical locations on race courses where timing hardware is setup to record passing racers. Most often these are; Start, lap and Finish.
- Crossing Order: The crossing order is the order that racers will cross timing points during a race. This is setup in the Zone4 Timing software in the Timing Devices section of the Courses page.
This can be a lot to wrap your head around so here are some visuals to help.
Timing Device

Timing Point

Crossing Order

Still don’t totally understand the concept of Timing Devices, Timing Points and Crossing Order? Don’t worry, you don’t need to completely understand to work through this task.
The more you familiarize yourself with Zone4 Timing, the more it will make sense. Be patient and keep going!
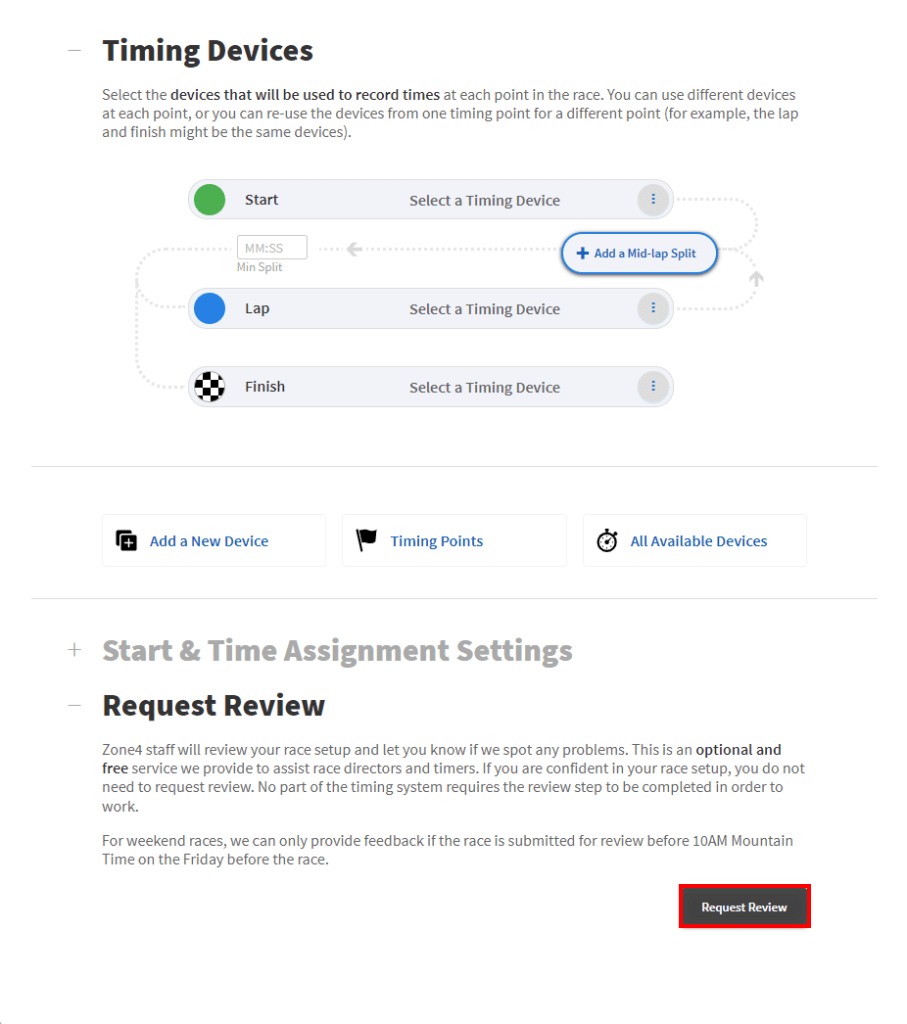
Assigning Keypads
For this example, we will be recording all times on a web keypad. This way we will not need any specialized timing hardware.
In a real race situation you would assign timing hardware using the Select a Timing Device button.
To assign a keypad to the Start timing point select the three dot menu and then select Record times on this Computer.

This will open a Browser Keypad in a new window. Don’t close the Browser Keypad window, just minimize it. We’ll use it later.
These Browser Keypads will take the place of a timing devices for this task and will be used to enter times for racers to simulate them passing timing points on a race course.
Repeat this step for both the Lap and the Finish Timing Points. Again, leave the windows open as they will be used later to record times.

If you want to Zone 4 staff to review your race set up hit Request Review.
Results
Next navigate to the Results page.

This is where you will configure results that racers can view live on zone4.ca. Here you can create multiple results sets such as Overall and Age Group results.
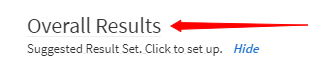
In the Results page three suggested result sets are displayed:
- Age Group Results: Racers will be separated into different result groups based on: Distance, Age and Gender
- Overall Results: All racers who are doing the same distance will appear in the same result group.
- Results by Gender: Racers will be separated into different result groups based on: Distance and Gender
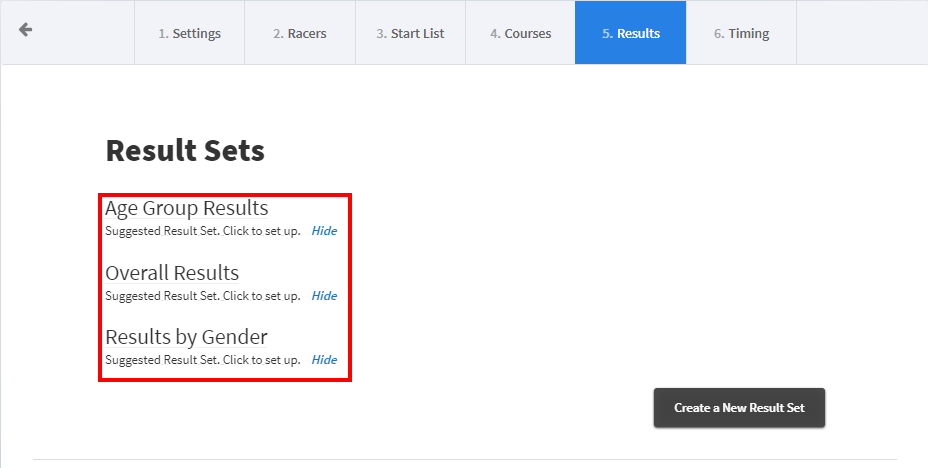
We will create two results sets for this sample race: Overall Results and Age Group Results.
Since we won’t need this result set template, you can click Hide beside Results by Gender to remove it form the list.

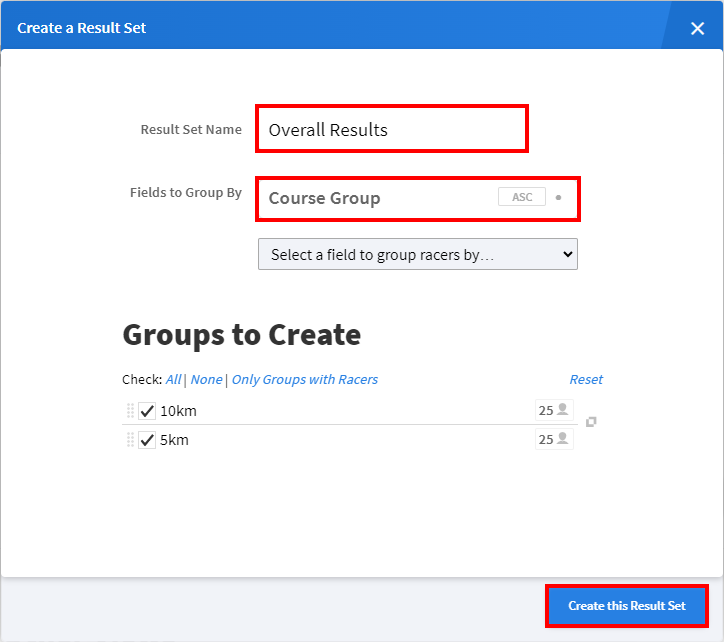
Overall Results
Click on Overall Results.
The Create a Result Set window will open. You will see that the Result Set Name is already set to Overall Results and that Fields to Group By is set to Course Group. *Note that Course Groups are the foundation of all Result Groups. You cannot combine Course Groups in a Result Set*. Click Create this Result Set.
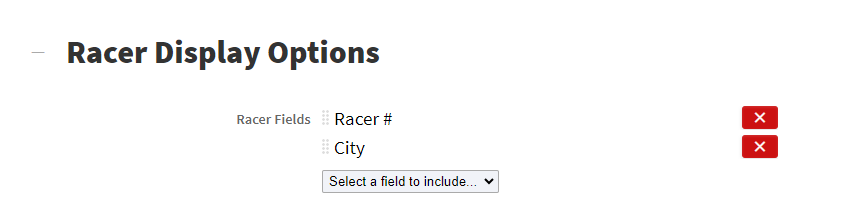
Now that your result set is created scroll down to the Racer Display Options section and use the drop down menu to add the Bib Number and City fields. This will display the information from those fields below the racers name on the results set.
Once this is done click the View Results button on the top left of the window.

Here you will see the admin results. We haven’t assigned any times so none will appear just yet. Your results should look like the image below.

Category Results
Exit out of the Overall Results set window.

Click on Age Group Results.

The Create a Result Set window will open. You will see that the Result Set Name is already set to Age Group Results and that the option Group racers by custom fields is selected.
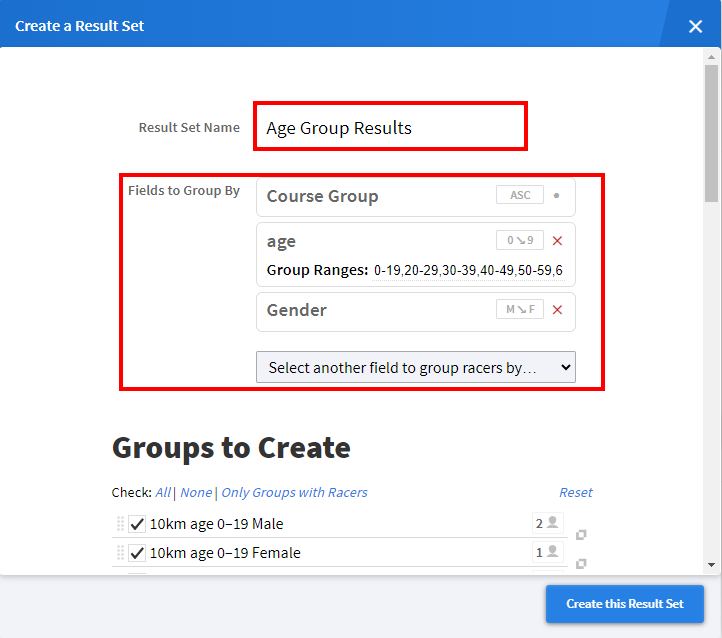
You will notice Two new Fields to Group By underneath the Course Groups. Here you will see the following fields have been selected: Course, age and Gender.
For this example, click on the numbers after Group Ranges:, and set the range to 0-20,21-99

This will effectively make “20 & Under” categories and “Over 21” categories.
If you scroll down to Groups to Create, you will have a preview of all the result groups that will be created. You will notice that there will be quite a few groups without any racers in them. To make sure these groups are not displayed we will select Only Groups with Racers as shown below.

Once this is done, select Create this Result Set.

You should now have a Racer Groups like the ones displayed below.
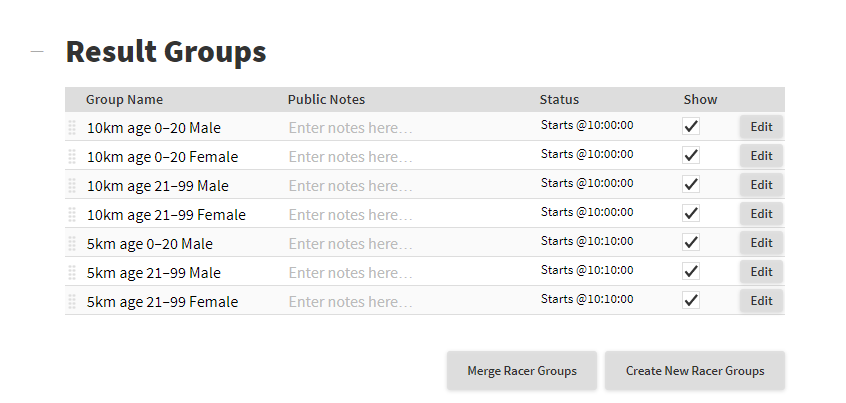
You may want to re-name these racer groups so that they are “20 & Under” and “21+” to make it easier for racers to navigate the results page. To do this, click on the Group Name and you will be able to change the racer group names.

Next under Racer Display Options we will again add the Bib Number and City fields.

You can then select View Results to see the admin results set.

Publishing Results
So far all the results sets we have created have been private results, meaning they are only visible to signed in users.
If you would like to see what the results would look for the public you can select Publish & Print and select Post to Zone4.ca. Don’t worry, selecting this option will not make them publicly visible on zone4.ca!

This will give you three options for Results Visibility. Select Un-Listed. This will create a public URL link where the results are visible but this link will not be posted on the Zone4 homepage. Do not select Public because this will display results on the Zone4 homepage.

Clicking on the URL will open a window with public results.


If you would like to learn more about setting up results click here.
Timing

Next we will go to the Timing page. This is where you will spend most of your time during a race since it will give you the most information about what is happening on course and help you keep track of racers during your race.
Testing Timing Devices
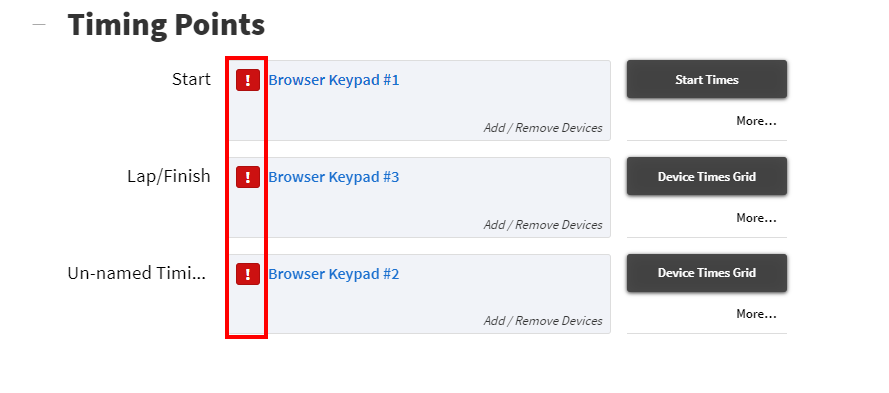
If you scroll to the bottom of the page you will see a list of all the timing points. You will notice that they all have a red exclamation mark next to them. This is because no time have come in from these devices yet so they have not been tested.
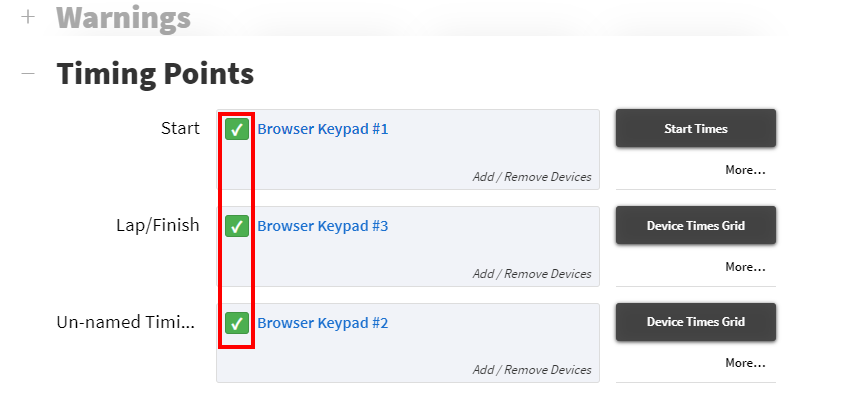
To test them navigate to each “Browser Keypad” that was opened earlier.
In each keypad press Enter. This will create raw times that are not assigned to a racer number. You can also use numbers that don’t correspond to any racer numbers in the race. (999) is a go to.

Once this has been done for every keypad all the check marks next to the timing points will be green.
If this does not happen, don’t panic. You can also check that the point is working by clicking on the Device Times Grid button to the right of each point. This will show you all the times that have been recorded by that timing point within the race window. To see the Start Times Gird, first click on the More… button below the Start Times button.

Start Times
After the devices have been tested we will move onto assigning start times. For mass start races like this one, all racers in the same start group will have the same start time.
To record this time we need to assign a time to a racer that is in a particular start group using the device that is assigned to the start. Assigning a start time to one racer in a start group will assign the same start time to all the racers in that group, when using a mass start.
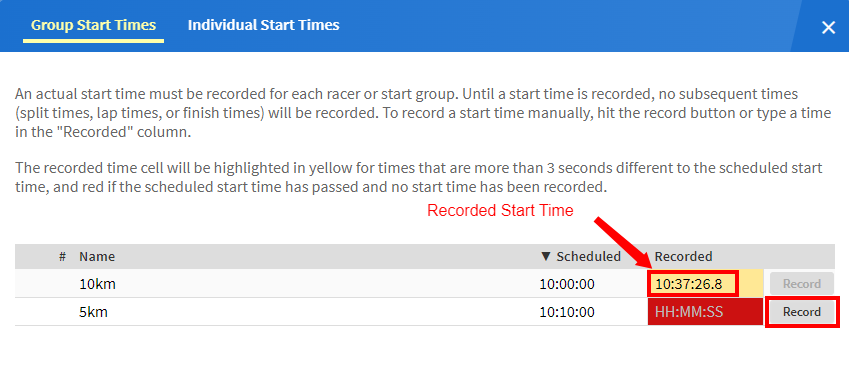
So navigate to the keypad device that is assigned to the start (Browser Keypad #1) and select “1” and “Enter” as shown below.

This will assign a start time to all the racers in the 10km start group because racer number 1 is in that group.
If you navigate back to the Timing page you will notice that it now says there are 25 racers on course.

Lap and Finish Times
Now navigate to the All Assigned Times window for the 10km as shown below.

This window will show all the individual times that have been assigned to racers.
Use the lap and Finish devices (Browser keypads #2 & #3) to assign times to various racers in the 10km group (1-25).
You can do this by following the same steps as setting a mass start. However, now when you assign a time to a bib number it will only be assigned to that racer and not to the whole group.
You will see their times appear in this grid (in time of day) once they are entered.

Not getting times? Check the following.
- Are you entering times on the correct keypad? To check which keypads are assigned where go back to your Courses page.
- Are you trying to record times outside of your race window?
- Do your racers have start times? To check, on the timing page scroll down to the Start Times section and select the Manage Recorded Start Times.

In a Mass Start race such as this, you can also start the race by clicking the Record button hightled above.
Once several times have been entered navigate to the Results page and select a results set. You will see that those racers now have actual times.


To get more practice you can then repeat the process of entering times with the 5km group.
To learn more about the timing page and for general tips on timing a race click here.
Final Thoughts
Congratulations! You have completed this task.
Now that you have created a race and assigned times feel free to play around with this race. Once you know some of the basics of Zone4 timing (as you now do), sometimes the best way to learn more is by clicking on buttons and seeing what they do.
If you like a little more structure, try using our documentation. Here are some useful links.
- Software Overview (including links to detailed step by step guides)
- Features
- Sport Specific
- FAQ
- Race Day Preparation