Application Process
Zone4 has partnered with Helcim.com to provide merchant accounts to interested clubs. It’s important to understand the full process and documentation requirements so here is the full on-boarding process which you should review before deciding to go with Helcim.
- Go to: https://admin.helcim.com/signup/
- Fill in your own name, Club (Organization) name for the Business Name, email address, and Country
- Agree to the Privacy Policy and TOS, and click Create Account.

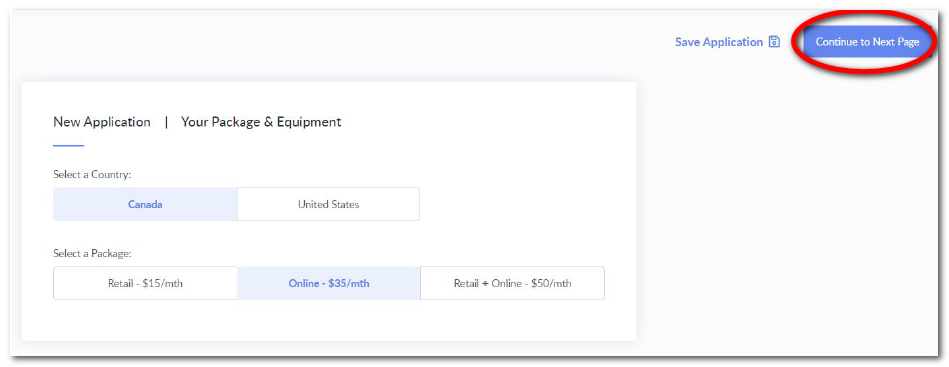
You are now ready to begin the application process. For integration with Zone 4, you will want to select the $35/month Online option. Click on the Start Now button below the account type.

On the next screen, you will need to confirm your country and the package, the $35/month Online package should be pre-selected for you. Once you have confirmed these selections click on Continue to Next Page in the top right-hand corner of your screen.
You will now be asked for your business information. Enter the business information specific to your club. For the last question Do you accept credit card payments directly on your public website select No as your club’s website will not be processing credit cards directly.

Once the business information is entered click on Transactions at the top of the page to move to the next section.

Next, enter the Transaction Information for your business using the text boxes and drop-downs on the page. NOTE – Some tips: For the Search Code, clubs that have signed up for Zone 4 are usually Sporting and Recreational Camps, Recreation Services – Not elsewhere classified, Membership Organization – Not Elsewhere Classified, Athletic Fields or Ski Slopes. If you’re offering a membership or program registration your Average Delivery Turnaround will be one day, as membership and program benefits begin as soon as registration is complete.

Next, you need to enter the Transaction Volumes for your organization. Enter amounts as accurately as possible. If you are unsure, roundup from what you think it may be to ensure you’re not processing more than your estimates immediately as your account will be reviewed by an underwriter based on what you enter here.

Once you are done entering the Transaction Volumes, click on Bank Accounts in the top menu to move to the next section.

Enter your organization’s banking information into this screen. This is where the funds from your transactions will be deposited.

Once you’ve entered your banking information click on Principals/Owners to move to the next section.

Enter the contact information for the main owner of the account.

If you need to add more than one owner, scroll to the bottom of the page and click on + Add
Principal.

Once you’re done adding account owners, click on Addresses.

On this screen, you can enter your Business Address, Corporate Address, Mailing Address, and Shipping Address.

Click Save Application to save all the information you have entered and then click Continue to
Submission Review to move to the next stage.

Once you have entered all of the information requested in the tabs click on Continue to Submission Review in the top right-hand corner.
On this page, you’ll need to complete three steps. Begin by reviewing and signing the application agreement. You are able to e-sign the document from your computer.

Next, upload a void check or similar bank document to verify your banking information.
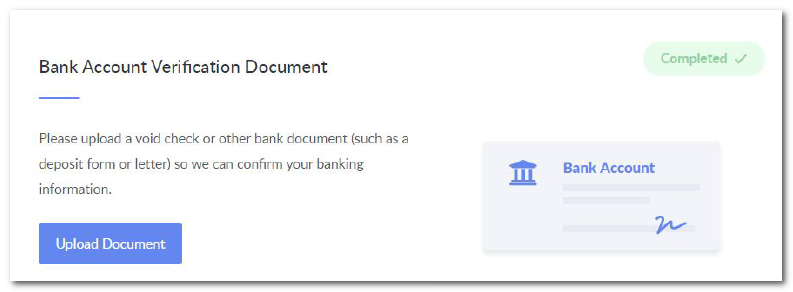
Finally, select your business verification document from the drop-down menu and click onUpload Document to upload the file.

Now click on Submit Application for Review.

Setting Up Your API Integration
Your application will now be reviewed by a member of the Helcim Team. While you wait for it to be reviewed, click on Enter Demo Now to set up your API connection to Zone 4.

After clicking on Enter Demo Now you’ll be taken to your dashboard. Click the grid icon in the upper left corner and then click Merchant Tools -> Integrations as seen below.

On Integrations it should default to the API Access Configuration tab

Next, click on New API Access

Now, enter the details for the Zone 4 Integration.
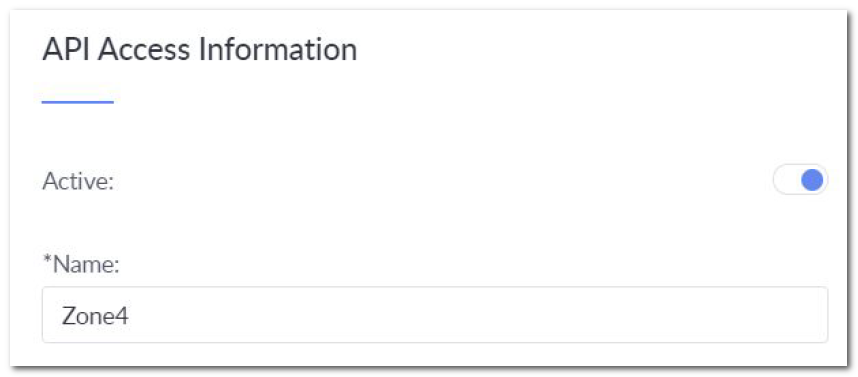
Active: Toggle the radio button to On
Name: Enter Zone4 into the textbox

Void: Toggle the radio button to On
Refund: Toggle the radio button to On
Settle: Toggle the radio button to On
Access Self-Transactions Only: Toggle the radio button to Off
Terminals: Toggle the radio button to On
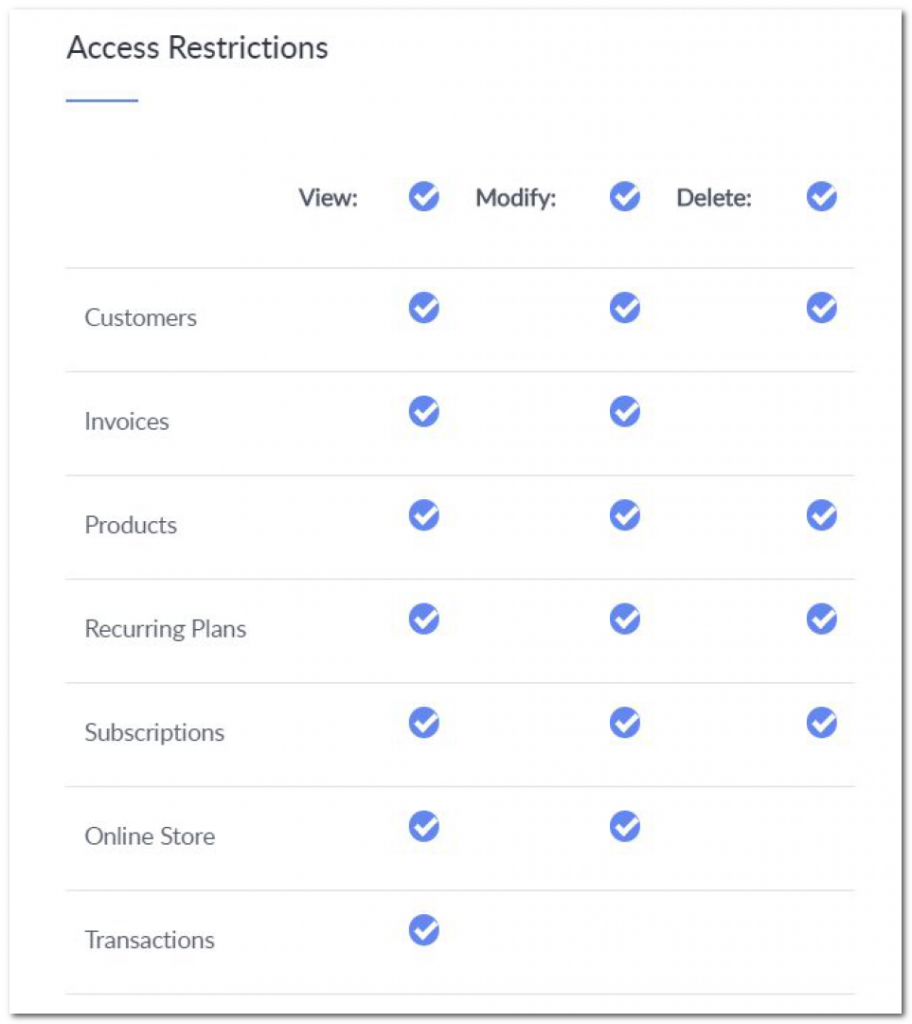
Click the boxes at the top of the screen to turn on all the access restrictions. Then in the top right corner of the screen, click Save to apply the changes.

When you click Save, you will then see a Token value listed below the Nickname. Copy that Token value into an email.

You will also need to copy the Account ID for your account into the email. For instructions on
finding your Account ID, follow the steps in this article here.
( https://support.helcim.com/article/integrations-how-to-find-your-account-id/ )
Next, click on the Integrations menu and Helcim.js Configurations from the menu on the left-hand side of your screen.

Next, click on New Configurationand enter the options as follows:
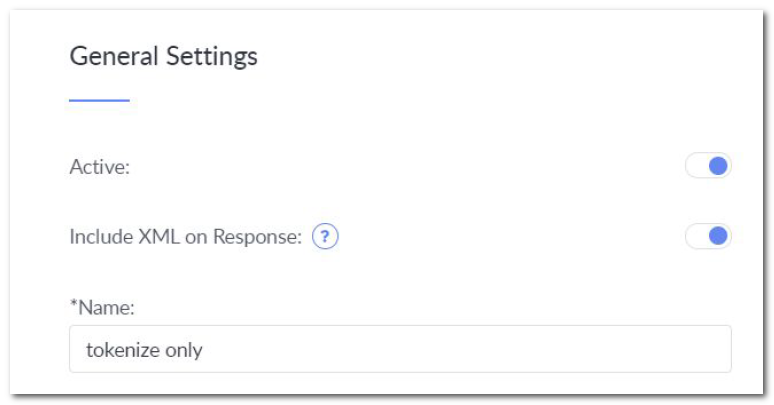
Active: Toggle the button On
Include XML on Response: Toggle the button On
Name: tokenize only

Test Mode: Toggle the button to Off
Currency: Canadian Dollar
Transaction Type: Card Verify (Tokenize Only)
Terminal: Select the available terminal from the drop-down

Enforce Hashing: Toggle the button to On
Then in the upper right corner click on Save

When you click on Save Helcim will generate a Token and a Secret Key, copy both of these into the same email you added the previous token and your Account ID into. These will be sent to Zone 4.

Once your Helcim account has been approved, send this email with the AccountID, API Token, Helcim.js Token, and Secret Key value to support@zone4.ca so that Zone4 can link your Zone4 account with your new Helcim merchant account.
Zone4 will connect your Zone4 account to your Helcim account and then test the connection. In order to test the integration fully, Zone4 will do the following:
- Setup and approve a new registration called “Helcim Live Test”.
- Register ourselves into that registration and pay $2. This ensures our credit card is charged successfully.
- Zone4 will then refund $1 of that transaction from within Zone4 to make sure refunds are working correctly.
After successfully testing your account Zone4 will notify you that you can begin running transactions through Zone4 onto your merchant account.
Adding Zone4 as a User on your Helcim Account
If you require extra assistance inside your Helcim account, you can add Zone4 staff Dan Roycroft as a user using the following procedure.
On the left hand menu, under My Account, click Users & Employees, then click New User

On the New User screen, enter the name as Dan Zone4, and the email address dan@zone4.ca with phone number 403-609-4968. Select the role “Developer“, and check the boxes for View, Transactions, Statements, and Modify.
Click the blue Save button when done.

After the user saves, you will see a screen as follows, scroll down to the section where you see your organization helcim URL and click the light blue “Modify Access” button

Under “Transaction Access“, check the “Transaction” box which checks all the items in the row. Under Terminal Access, check the Process checkbox. And Under General Access, click the View, Modify, Delete checkboxes which selects all the checkboxes below those columns. Click the blue Save when done.

This grants full access to dan@zone4.ca so Dan Roycroft can login and help administer your helcim commerce account.