
What are discount codes and when would I use them?
Discount codes are an easy way for event organiser to give discounts to a restricted set of registrants. One possible use of this field is if a club is organizing a race and wants to offer a discount to members of their own club. In this case they would set a discount code and then distribute that code among their members (usually via email). When the members enter the correct code they get the applicable discount.
Types of Discounts
There are three different types of discounts that you can set. These are;
- Percentage Discount: This discounts the registrants fees by the specified %. So 100% would mean a %100 discount or “Free”.
- Discount Fixed Amount: This deducts a set amount from the total fees that a registrant owes.
- Pay Fixed Amount: This means that the registrant will pay only the fee specified in the discount code no matter what they owe before entering the code.
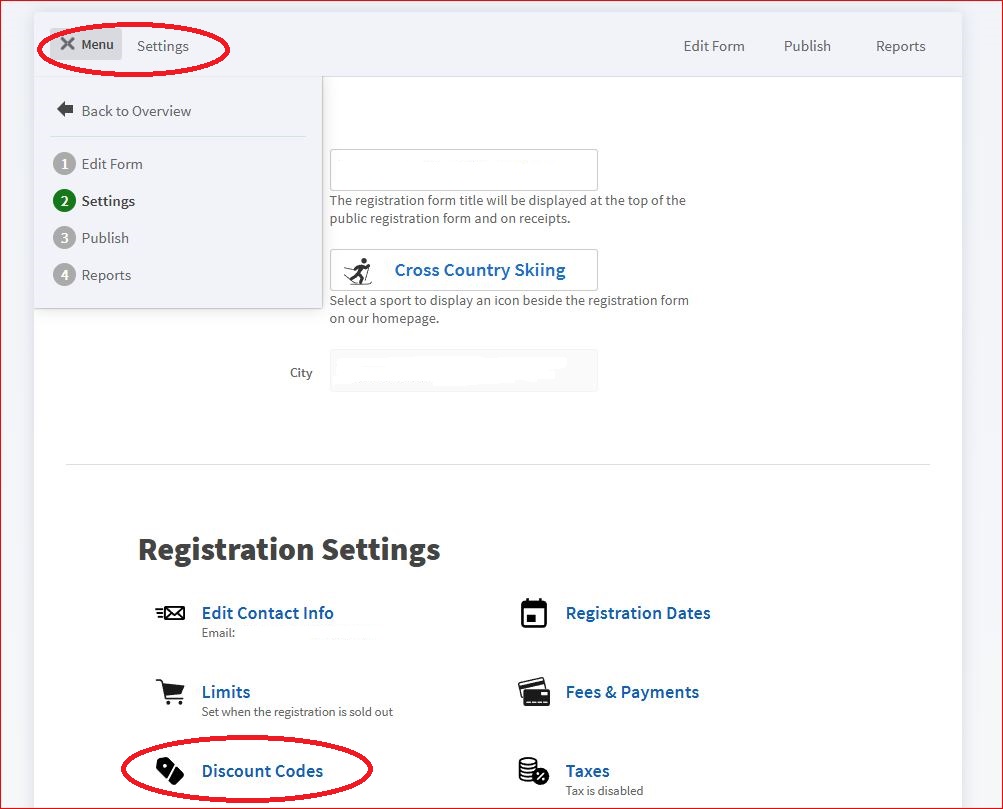
Adding a Discount Code to your Form
On the Settings tab of your Regisration, select Discount Codes
This will take you to a window where you can Add a Discount Code and then you can create as many discount codes as you like. It’s up to you to set what the code is. You will see a randomly generated code, but you can edit it to choose something that is memorable or references your event sponsors.

When you’ve created all the discount codes you need to, click the save button at the bottom. If you need to add more discount codes later, you can return to the Settings tab / Discount Codes to get back to this screen.
Advanced Discount Code Features
- Creating Codes that only apply to certain fee fields
- Quantity Limits on the usage of specific discount codes
- The ability for registrants to stack or use multiple discount codes on the same registration.


When editing discount codes, you will see 3 buttons for the 3 different types of discount codes you can apply: Percentage %, Pay Set Amount, or Deduct Set Amount.
Click The “Add Percentage % Discount Code” button to bring up the following dialog.
Enter the % Off such as 25 for a 25% Off discount.
The Code is what the registrant will type in to get this discount. It can be whatever you like, but should be memorable and not easily guessable.
The Description should be a short text describing what fields this code applies to. This description will be shown to registrants after they type in the code.
Quantity, if you want to limit the number of times the code is used. Leave blank if no limit is desired.
Select which fees the code applies to. Either select “** All Fees **” or select the checkboxes corresponding to the fee fields this code applies to.
When you click “Add Discount Code” it adds the entry to your list. Note that you cannot edit the Applies To fee fields after you add the code and once your registration is live, the Code and Amount fields will also no longer be editable. You can however always edit the Quantity field so removing a code is as simple as entering 0 for Quantity.

The ability to have one discount code that applies to one set of fees (such as race fees) and another code that applies to another set of fees (such as trail passes) created the need to allow multiple codes to be applied to the same individual. The public implementation of this feature now handles this concept by applying whichever code would grant the registrant the highest benefit. So for instance if they had two codes, one for 10% off all fees, and a 2nd code for 25% off the race fees, the system will use the 25% discount on the race fee fields, but then use the 10% on the remaining non-race fee fields. So the key thing to note is that it does not add 25%+10% or try to compound them, it just picks the higher of the two.