For races that will be importing points, or exporting results to a system that requires race licences to be included, it is important to check that the correct race licences are entered. Racers will often enter incorrect or invalid race licences when they register.
Navigating to the Licence Check Tool
On the Reports tab of a Zone4 race registration form, find the “Check Racing Licences” button.
If your registration form has more than one licence element, you’ll be asked to choose which licence you want to check.
If your registration form does not have any licence elements, this button will be disabled.
Checking Licences
For each person in the registration form, we look up the licence in our database that matches that name, date of birth, and email address. If the licence we find matches the licence number the person entered on the registration form, we call that licence correct. If it doesn’t match, the system will prompt you to update the licence to what it thinks the correct value should be.

If we are unable to find a matching licence for the person in our system, you’ll be prompted to erase that person’s licence number.

If the name and birthdate don’t exactly match the name on the licence (Ben instead of Benjamin, for example), we will use the athlete’s email address and postal code to confirm the match. In some cases, especially where a coach registers all their athletes with the coach’s email address instead of the email address the athlete normally uses to register on Zone4, the system may get it wrong. If you think the system has returned an incorrect match, don’t apply that suggestion.
Expired Licences
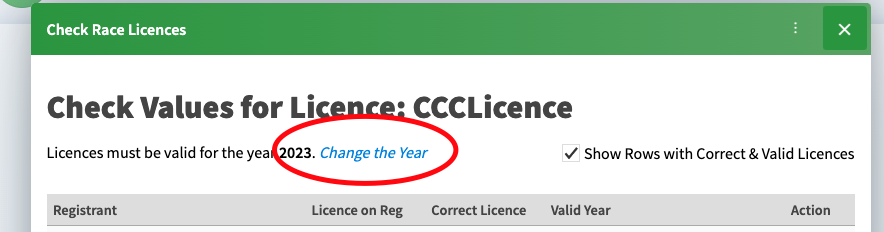
Race licences must be renewed every year. In our licences database, we store the year that a licence is valid for. If the year on the licence doesn’t match the year that licences must be valid for, we call that licence expired and prompt you to erase it.

To change the year the system compares licences to, click the link at the top of the page:
The (in)correctness of the CPL database
The source data from the CPL database has numerous duplicate racers in it, where the same person has multiple licences and it’s not clear which licence they’ll be racing under. If you encounter a case where a racer seems to have multiple valid licences for the same person, please contact Nordiq Canada to get it cleaned up.
Validating Racer Data Against Licences
After you have checked to make sure that all the racers have correct licences which match the information they registered with, you can go the other direction and check to make sure that the information that racers entered on the registration form matches the information on their licence.
From the reports tab on the registration form, navigate to “Data Validation” to see a list of all the racers whose information doesn’t match their licence. You’ll see an “Update” button beside each mis-matched value. In many cases, this will be a judgement call to decide whether the info on the licence or the info on the registration form is more correct.

Ignoring Registrants who are not Racers
Many races will use the same registration form to collect information for people who are not racers, like coaches. If you would like to hide people from the validation tool based on the value of a registration field, use the Set Inclusion Criteria option

Exactly how you set this criteria will depend on how your registration form is configured.
